Clarissa’s Organic Ratatouille

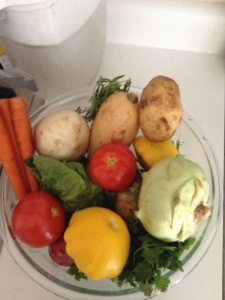
The ingredients in this ratatouille are without an exception fresh and organic (including the herbs). Here they are:

20130615-185834.jpg

Young carrots, tomatoes, rutabaga, a couple of young potatoes, a pattypan squash, English peas, a baby turnip, butternut squash, a head of Boston lettuce, a kohlrabi, basil, chervil, oregano, savory, cilantro, garlic.

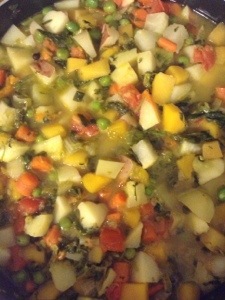
Dice the vegetables and add them to a pan with some olive oil beginning with the least soft vegetable. Add some water to cover the bottom of the pan. Gradually add the shredded herbs. Salt to taste. Everything should be sautéed very slowly for about 90 minutes.

20130615-190427.jpg

It tastes phenomenal. And if somebody tells me this is unhealthy, I give up because I can’t do anything healthier.

My Grandmother’s Recipe Book

The most meaningful and amazing gift I got this holiday season was this book of recipes that used to belong to my grandmother Clarissa (the one who gave her name to this blog):

recipe book

It was very hard to be a good cook in the Soviet Union because finding ingredients was a heroic feat. And even if you were lucky to find anything, you always had to stick to the same few items. People went out of their way to create inventive recipes and these recipes were treasured and passed from one person to another.

Grandmother Clarissa was a phenomenal cook and she collected all these recipes in a notebook that later passed to my mother. And now my mother gave it to me. Grandmother’s main area of cooking expertise was baking. She baked a new cake every week-end and they were invariably beautiful.

I also love to cook but one thing I never do is bake. I don’t like baked goods, and I believe that the best dessert one can have is a piece of sausage. N., on the other hand, loves desserts and is especially partial to cakes. So I told him that this year I will make a resolution to make every single recipe from Grandmother Clarissa’s recipe book. N. was so happy that he had tears in his eyes although I warned him that I can’t promise these desserts will start coming out right soon.

So here is the very first cake from Grandmother Clarissa’s book that I just baked. It’s called “A Black Man’s Kiss.” Don’t blame me, blame the Soviet people for the strange names of these desserts.

Cake1

All of the elements tasted well separately. Now the cake will stand for 12 hours, and I will tell you how it tastes.

The recipe is under the fold.

Continue reading “My Grandmother’s Recipe Book”

Roast Chicken With Baby Potatoes and Mushrooms: A Recipe

I haven’t posted any recipes for a while, so I decided to share with my readers a recipe that might come in handy at the beginning of the academic year. This is a dish that takes very little time to prep but that can feed you for a week after you make it. If you have a stretch of a few busy days coming up, you make the dish and then forget about cooking for a while.

Here is what you will need:

– a roasting chicken;

– a sack of baby potatoes. Make sure they are baby potatoes because if you use regular potatoes, the dish won’t work.

– mushrooms of your choice;

– the herb of your choice. I use cilantro because I adore cilantro. Basil, tarragon or rosemary can also be used. There are also herb mixes that you can get instead of fresh herbs, if you are so inclined.

– half a stick of butter (can be skipped if you are trying to be healthy.)

– a few cloves of garlic.

1. In a roasting pan (I use a cheap disposable one to cut down on cleaning time), place quartered baby potatoes and mushrooms broken into pieces. There is no need to peel the potatoes after washing them. Just quarter them as fast as you can and throw some mushrooms on top. Add salt and pepper.

I like using baby potatoes of different colors because it always makes a dish more visually appealing

2. Melt the butter, squeeze a few cloves of garlic into it, cut up the herbs and mix everything in a bowl. It’s perfectly fine to skip the butter if you are trying to be healthy. Here is what the mix will like if you decide to use the butter:

3. Wash the chicken, salt and pepper it. I chose a big chicken because I have a few busy days coming up and want it to last for a while. Rub the herb, garlic and butter mix on the chicken. Try to get some of the mix under its skin. Then, stick some remaining fresh herbs into the inside cavity. Then, place the chicken on top of the potatoes and the mushrooms.

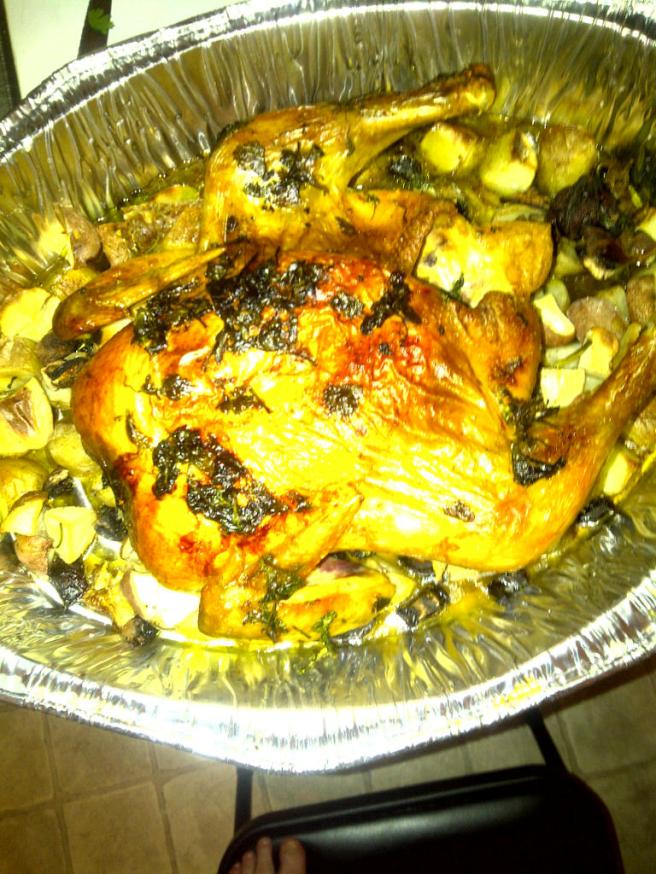
4. Place the entire thing into a heated oven and forget about it until it’s cooked. I never use a thermometer to determine when the chicken is ready. My way of knowing that it’s done is by smell. When it starts to emit a really delicious aroma, it’s done. This is how the dish will look when it’s done:

I had to stand on a chair to take the photo. 🙂


Clarissa’s Frog Legs Soup: A Recipe

I love making soups because you can be as inventive as you want and use up all the stuff you have floating around the refrigerator. Today, I decided to make a soup of frog legs and fish. Once again, a Google search didn’t offer any interesting recipes, so I decided to improvise. It turned out so good that I have already devoured two big bowls.

Here is what you will need:
3-4 pairs of frog legs
3-4 fish of any kind you like. The fish should be skinless but it is very important not to remove either the backbone or the tail. They are needed to make the broth less watery.
3 potatoes
2-3 carrots
salt, herbs, spices
some fresh sage
Here are the frog legs and the fish all ready for cooking. Separate frog leg pairs in two so that you have to separate legs. There is no need to chop them up onto smaller pieces.
You can use either fish stock or simply water if you have no stock handy. Place the chopped carrots and the frog legs into the broth (or water) and place the pan on high. You will need to bring it to the boiling point and then reduce the heat immediately.
Add a bay leaf, salt and pepper, and any herbs and spices you like. I added dry oregano, cumin seeds, several cloves, mustard seeds, and when the soup was almost ready, some fresh sage. Peel, cube and add potatoes to the soup. After 10 minutes or so, cut the fish into chunks of the same size and add them to the pot. Let the soup simmer on slow until the potatoes taste ready but not mushy. Here is how the soup ended up looking:
If you let it stand for a few hours after making it, the soup will taste even better.

Vegetarian: Clarissa’s Vegetable Ragout

Recently, I felt a craving for a good, colorful vegetable ragout. However, a long Internet search didn’t result in a single recipe that didn’t look boring or monochromatic and didn’t include either meat or canned vegetables. So I had to invent my own recipe. Some of the ingredients of this vegetarian ragout were things that I’d never tried before, like eggplants. (Yes, I’d never eaten eggplant in any form in my life.) I really loved the result and decided to share it with my readers.

Here is what my Vegetable Ragout ended looking like:
I’m folding the detailed description of how to make it under the jump break to spare those who aren’t interested the trouble of scrolling through endless photos of diced vegetables.

These are the main ingredients I chose for my ragout but you can, of course, change any of them. I selected three kinds of baby potatoes (yellow, red and black) because it’s very important to have a colorful ragout, juicy heirloom tomatoes, zucchini, yellow squash, baby turnips, baby eggplant, young carrots, garlic, ginger, and a bunch of cilantro.

Peel several cloves of garlic and crush them. Heat some olive oil in a large pan and place the garlic in the oil. In the meanwhile, cut your baby potatoes in half and place them in the pan, too.
Every step of this recipe looks colorful
and delicious. And it smells fantastic, too
Dice the turnips and the young carrots making sure that the chunks are not too small. If you cut them too small, they might become mushy, which is something we are trying to avoid. Vegetables in a ragout should be cooked but still preserve some firmness. Otherwise, we can just make a puree and be done with it. Then, add a bay leaf and some coriander seeds, if you like them. Dice ginger in very small cubes and add them to the pan.
The white chunks are pieces of baby turnip
Cut baby eggplant and add it to the pan. You don’t have to spread it around the way I did, of course. I just did it to make sure the photo is pretty, that’s all. During this entire time, the pan has been on medium-high.
In the same manner, cut the zucchini and the squash and throw them into the pan. Now it’s time to add herbs and spices (the choice is really up to you) and start making the sauce. Put 1 tablespoon of coarse-grained Dijon mustard and 1 tablespoon of tomato paste into the pan. Mix everything up. Add as much or as little salt as you want. (I’m trying to avoid salt altogether, so I added none and the ragout still tasted heavenly.) This is how your ragout will look after you complete this step:
Dissolve a tablespoon of flour in a cup of cold water and add the mix to the ragout. This will thicken the sauce. Close the pan with a tight-fitting lid and let the ragout simmer until the vegetables are almost ready. Then, dice the tomatoes and add them to the ragout. Also, add fresh cilantro. This is how the ragout will look at this point:
Mix everything up, close the lid, and leave the ragout on slow for another 10 minutes. And here we have it:

>Clarissa’s Cabbage Leaves Stuffed with Meat and Rice (Golubtsy): A Recipe

>

These Cabbage Leaves Stuffed with Meat and Rice  are called “golubtsy” in my country and constitute one of the favorite dishes of the Russian-speaking people. Tim, a reader from Germany, tells me that a similar dish exists there, and I have also seen something very similar at a Chinese buffet. However, I strongly believe that my recipe is one of the most delicious out there. Just compare the photo of how they look when I make them to a picture I posted yesterday from one of the most popular Russian-language website.
And these are my golubtsy:

Since not everybody is interested in cooking and there are quite a few photos that accompany this recipe, I will fold the recipe itself under the jump break. Otherwise, it will occupy the entire homepage.

What you will need:

For the cabbage pockets:
– 1 lb of ground meat
– a big head of cabbage
– a medium tomato
– a medium onion
– 5 cloves of garlic
– 1/2 bunch of cilantro
– a cup of rice
– some salt
For the sauce:
You can either just use your favorite tomato sauce and avoid the aggravation, or make my favorite tomato sauce. To make it you will need:
– a small can of tomato paste. I use Hunt’s because it’s the best, in my opinion
– 2 carrots
– a can of canned beets
– carrot juice
– 1/2 bunch of cilantro
– a cup of sour cream

1. Take a tomato, an onion, 5 peeled cloves of garlic, and 1/2 bunch of cilantro.

Put them all into a food processor and blend until all chunks disappear.

2. Add the resulting mix to the ground meat. For ground meat, I usually combine ground pork and ground beef for most of my recipes. Then add salt to taste and mix everything up. This is how the whole thing will look as a result.

3. Boil some rice until it’s just al dente (make sure you don’t overcook it!) and add it to the filling.

It is very important to make sure that the rice is quite firm and not mushy when you add it to the filling. Mix everything up, and your filling is ready.

4. Take a big head of cabbage and carefully remove the 8 or 9 of the biggest outer leaves. Try to remove them without tearing them. Don’t be afraid, though. I’m the clumsiest person on the planet, and I managed to do it without spoiling a single leaf. It helps to make a cut at the top of the leaf where you see this really thick part joining the leaf to the cabbage.

5. Boil some water in a pan and plunge the cabbage leaves into the boiling water one by one. The goal is to make the leaves soft enough to be folded but not mushy.

Five to seven seconds in the boiling water are usually enough.

6. After you get the cabbage leaf out of the boiling water and let it cool down some, you will need to cut off the thickest part of the leaf. I draw a very uneven red circle around it in the next picture. I’m insanely proud of my technological sophistication right now.

7. Put some filling into the cabbage leaf and fold it like a little envelope.

8. Then, place all the folded stuffing-filled cabbage leaves into a pan. This is what the whole thing will look like:

9. As I said, now you can either pour your favorite tomato sauce on top and let the whole thing simmer on a very slow fire for about an hour, or you can make the sauce the way I do it. Mix a cup of beet juice (from a can of canned beets), a cup of carrot juice, a small can of tomato paste, and a cup of sour-cream. Pour it on top of the cabbage pockets. Add some diced carrots and beets. Put some fresh herbs (cilantro is what I prefer) into the pan, too. Let everything simmer for 1 hour. And you are done.

10. Don’t tell me this isn’t beautiful:

>Seafood Risotto

>

This is the seafood risotto I just made. Making risotto is extremely hard. The first time I made it, it stuck to the plate like cement and, I couldn’t get it to budge in any direction. I still ate it all just to punish myself for wasting great ingredients. Of course, I had to use a steak knife to saw through that sad plate of risotto-based Crazy Glue.

Restaurants almost never know how to make risotto either. More often than not, you just get a plate of rise smothered in cheese. Even expensive, famous restaurants frequently mess it up. There was an absolutely perfect mushroom risotto that was served at a restaurant on McGill College in Montreal. Sadly, that restaurant has closed. Even at The Modern restaurant in New York the risotto was the weakest dish of all.

The good news is that with every risotto I make, I get a little better. This seafood risotto I made today looks great and doesn’t stick to the plate at all. This particular version of risotto contains clams, scallops, shrimp and oysters. Even if the risotto itself were bad, the beautiful seafood would go a long way to redeeming it.

P.S. By huge popular demand of one reader, here is the recipe:

1. Pour some olive oil into a pan. Add some crushed garlic and fry it for not more than a couple of minutes. Add 1 cup of arborio rice. Make sure that every grain of rice is covered in olive oil. 
2. When the rice starts acquiring a slightly golden hue, slowly add one glass of dry white wine to the pan. (Feel free to skip the wine and add fish stock instead.) Keep mixing the rice the entire time. It should be prevented from sticking to the bottom of the pan.
3. When the wine reduces, add some fish stock. Keep adding the stock in little portions as it keeps reducing. Remember that you will need to stop adding liquids when the rice is al dente. Nothing is worse than a risotto whose cook didn’t stop on time.
4. In the meanwhile, peel and devein shrimp. Place clams in a pan of boiling water. In a bout two minutes, the clams will open. When that happens, take them out of the pan. If there are clams that failed to open, throw them out.
5. When the rice is about 5  minutes away from being al dente, add the shrimp, the oysters, and the scallops to the pan. (This seafood can be substituted with any other kind.) Add some grated Parmesan. I also add cilantro because I love it and add it to everything. 
6. When the risotto is about two minutes away from getting done, place the clams strategically all over the surface of the risotto. Make sure you serve it while it’s hot. Leftovers are not bad either but nothing beats freshly made risotto.

>Clarissa’s Stewed Rabbit: A Recipe

>

If you never tried rabbit, maybe it’s time you did. Rabbit is good, lean meat and, if cooked right, it is delicious.
What you will need:
1 medium sized rabbit
1 onion
1 bay leaf
2 tablespoons of coarse-grained Dijon mustard
2 tablespoons of sour cream
1 tablespoon of flour
1 teaspoon of rosemary
half a can of green peas
herbs of your choosing
water of bouillion
salt and pepper

1. First, you’ll have to defrost your rabbit because they are usually sold frozen in this country and wash it.

2. Then, you’ll have to butcher it. So if you are at all sentimental about cute, little bunnies, then maybe this is not a recipe for you. The good news is that butchering a rabbit is extremely easy. It usually takes me about five minutes to cut it into pieces like the ones you can see in the picture:

3. Season the pieces of rabbit with salt and pepper. Then, brown them lightly on both sides in olive oil:

4. After the pieces have browned, add them to a large pan, and cover them with bouillion or water. Add an onion, some black pepper and your favorite herbs. I have added a bay leaf, rosemary (which goes really well with rabbit), some mustard seeds (because I love them) and some coriander. Bring the water or stock to a very light boil and put the pan on medium-low heat for about 30 minutes.

5. Add 1-2 tablespoons of coarse-grained Dijon mustard to the pan. However, if you only have cheap mustard of the kind that people put on hot dogs, it’s better to skip this step altogether. Bad mustard can kill this dish completely. Dissolve two tablespoons of sour cream in cold water and add it to the stew. Then, dissolve a tablespoon of flour in cold water and add it to the pan. This is how your rabbit will look after you do all this:

Add some salt to taste to the stew, cover it and leave it to simmer for another 45-60 minutes, or until the rabbit becomes tender. When the rabbit is almost done, add some green peas.
6. I serve the rabbit over mashed potatoes but any other garnish will do, of course:

Enjoy!

>Clarissa’s Sauerkraut Salad: A Recipe

>

This is a very traditional salad that we make often in my culture. Since good sauerkraut is hard to come around in the area where I live, I make my own. It isn’t difficult at all to make it, and if people are interested, I can share how it’s done. My country isn’t rich in vegetables and vegetarian options do not abound. This is probably the closest we come to a vegetarian and healthy dish. (Here I do need to remind you that Ukrainian cuisine is probably among the most unhealthy in the world. Everything is salted, pickled, and smothered in lard. It is what it is, so I’m just trying to make the best of it.)
What you are going to need:
sauerkraut
potatoes
beets
pickles
scallions
canned green peas
olive oil
Some people also add carrots but I make my sauerkraut with carrots, I don’t add any more to the salad to avoid overpowering it with a carroty taste.
I don’t put any proportions here because it is really a matter of individual taste. Just keep adding ingredients and stop when you reach the taste profile that makes you happy.
1. Boil some potatoes but make sure they are not overdone. Nothing is worse than a mushy potato in a salad. Potatoes should still remain pleasantly firm inside after you boil them. 
2. Many people boil their beets too, but it’s always better to bake them in foil. Beets should also be taken out of the oven before they become mushy inside.

3. While things are boiling and baking, cut up some scallions and pickles and mix them in a big bowl with sauerkraut and green peas. Don’t overdo the pickles. Two medium-sized one are more than enough for the bowl of this size.

4. In the absence of a Russian food store in a close physical proximity, these are the pickles that I use for all my recipes because they come very close in taste to the real thing. I don’t suggest getting any other brand of pickles because the strong vinegary taste of most North American brands will demolish the taste of all my recipes.

5. Then, when potatoes and beets are ready, dice them and add them to the salad. The smaller you dice them, the better the quality of the salad will be. Then, add a little olive oil (I never add more than a tea spoon, unless the sauerkraut is extremely dry), mix everything, and enjoy.

>Canukistani’s Canadian Style Maple Syrup: A Recipe

>Canukistani, a fellow Canadian and a reader of this blog, noticed that I haven’t posted any recipes in a while, and gave me the gift of the following great post to share with everybody. It is not only useful, it’s funny like hell. I laughed so hard, I’m in actual pain right now. Enjoy! And never say that Canadians don’t have a sense of humor ever again. Thank you, Canukistani!!


Canadian Style Maple Syrup
(Eat your heart out Martha Stewart)
This is my recipe for making Maple syrup from scratch. You might wonder why not just buy it at the store. This stuff is damn expensive! Here’s a graph of the cost in various cities. And you think gas is pricey.

You’ll need: a map, 20 – 40 tree taps (sprules), 20 – 40 metal buckets with lids, drill, 7/16 “drill bit, hammer, 3 foot cloth measuring tape, two helpers, a cord of wood, three large iron kettles, hooks and iron chains, saw, axe, beer, thermometer, brix refractometer, filter sieve, oven mitts, tent, sleeping bags, shotgun, lamps, more beer and a variety of glass bottles with lids. One item which you won’t recognise is a tree tap or sprule.
This can be purchased at a Canadian Tire depot with dollars or Canadian Tire money which is Canada’s real currency.
 
One item which you won’t recognise is a tree tap or sprule.
This can be purchased at a Canadian Tire depot with dollars or Canadian Tire money which is Canada’s real currency. 
You may have not come across a brix refractometer either. Ditto Canadian Tire.
The first item on the agenda is to travel to an area which actually has sugar bush. 

Good weather for sap production is night temperatures in the 20s F and sunny days with temperatures in the 40s F. This alternate freezing and thawing temperature cycle (which can also cause potholes on roads) causes the pressure changes inside the tree that makes the sap flow. If the night time temperatures are too cold, it takes a longer time for the sap to warm up and ‘run’ in the daytime. If the temperatures are very cold, the sap may not run at all.

WARNING! You might run into bears which have just wakened up from hibernation and are HUNGRY. Safety first. Bring at least one person who can’t run as fast as you. If you’re particularly Machiavellian buy insurance with yourself as the beneficiary. Alternatively do a Sarah Palin and arm yourself with a short barreled SxS 12 gauge with Remington Buckhammer slugs – don’t retreat. Reload!
Learn to recognize the right trees. Tapping an elm tree is pointless and embarrassing. The main maple producing tree is known as the Sugar Maple, or Hard Maple ( acer saccarum) which is the best provider of the highest quality sap. It grows as tall as 100 feet. A few of the other main types of maple trees are The Red Maple (acer rubrum), The Silver Maple (or Soft Maple) and The Ash Leafed Maple (or Box Elder) You may need to enlist the help of the indigenous people. They are friendly and will trade for Canadian Tire money.

Local and two specimens of H. Canukistanus (two of my daughters)
 Depending on the tree’s diameter and strength, it may be fitted with as many as three (3) taps. Use the cloth tape to measure the diameter. Trees with trunks less than 25 cm in diameter should not be tapped at all. Prudent tapping is harmless to the maple. Each tap will produce 10 gallons over a six week period.
Drill 1 cm (7/16″) holes about 5 cm (2-2 1/2″) into the trunk of the tree. Use the hammer to place the sprules into the tree. The sap will deteriorate if not attended to. The sap must be boiled the same day it is gathered, so a hot and steady fire is kept going at all times.

The “boiling down” process is slow – sometimes continuing far into the night. Bring lots of beer. Evaporation that is too slow or too fast will affect the color, flavour and texture of the syrup. At sea level, the correct temperature for evaporation is 104ºC. However, since the boiling point varies with altitude, a thermometer must be used to adjust the cooking temperature. For example, in a region where the boiling point of water is 98ºC (or 2ºC below normal), the cooking temperature of the sap must also be reduced by 2ºC (to 102ºC

I use the three kettle method where I put the raw sap which has the consistency of water into the first kettle and then transfer the more concentrated sap into the second. Repeat from the second kettle to the third where the final evaporation takes place. It takes about 40 gallons of sap to make one gallon of syrup. If you use maples other than the sugar maple, the syrup will be darker because the other trees have a lower concentration of sugar and the boiling will take longer.

Maple syrup must be filtered to remove the impurities that could affect its appearance and flavour. Orlon or felt make good filters. Filters should be cleaned with hotwater only (no detergent) and dried thoroughly before and after each use. New filters must be washed before use. Bottles or jars used to store syrup should also be cleaned and rinsed prior to bottling. It is important to adjust the density to between 66º and 67º Brix (the Brix unit of measurement indicates the risk of fermentation or crystallization). Use the brix refractometer. The syrup is then bottled or put in galvanized metal cans while still very hot (87ºC or more). The heat sterilizes the containers and prevents the formation of mold.

You can use maple syrup as a replacement for sugar in any recipe.